If you’re involved in surface preparation, you already know one thing — nozzle pressure makes or breaks blasting performance.
I’ve seen many cases where poor profile or slow production wasn’t because of the abrasive or compressor size — it was simply low nozzle pressure.
Before blaming the equipment, always verify the pressure at the nozzle.
Why Nozzle Pressure Is Critical
Blasting efficiency depends on impact velocity. And impact velocity depends directly on nozzle pressure — not compressor gauge pressure.
Most project specifications require:
Minimum 90 PSI (6.2 bar) at the nozzle during active blasting
Not at the compressor.
Not at idle.
At the nozzle — under load.
Even a small drop in pressure can reduce surface profile and affect coating adhesion.
The Correct Way to Measure Nozzle Pressure
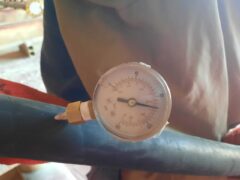
The only reliable method in the field is using a hypodermic needle pressure gauge.
This is standard practice in oil & gas, marine, and heavy industrial projects.
Step 1: Blast Under Normal Working Conditions
Start the blasting operation and ensure:
- Compressor is running at normal capacity
- Abrasive flow is steady
- Operator is blasting as usual
Pressure must be measured while blasting is actually taking place.
Idle readings are meaningless.
Step 2: Insert the Needle Gauge
Insert the needle approximately 18 inches (450 mm) behind the nozzle into the blast hose.
The needle must penetrate into the air stream — not just the outer rubber layer.
Take the reading while blasting continues.
Step 3: Record the Reading
Check the gauge and record the pressure.
If the reading is below 90 PSI:
- Check for excessive hose length
- Inspect couplings for leaks
- Verify compressor CFM capacity
- Inspect nozzle wear (very common issue)
Worn nozzles increase orifice size, which reduces pressure significantly.
Step 4: Document the Inspection
Record:
- Measured pressure
- Nozzle size
- Hose length
- Date and location
- Inspector name
This becomes part of your blasting QA/QC documentation.
Practical Tip from Site Experience
If your pressure is low but compressor pressure looks fine, 80% of the time the issue is:
- Worn nozzle
- Long or undersized hose
- Multiple air connections
Always calculate total pressure loss across the system.
How Often Should You Check?
At minimum:
- Start of every shift
- After nozzle replacement
- When blasting speed suddenly drops
- Before final surface inspection
Step-by-step Procedure For Measuring Blasting Nozzle Pressure Using a Hypodermic Gauge
Time needed: 15 minutes
Step-by-step procedure for measuring blasting nozzle pressure using a hypodermic gauge to ensure compliance with surface preparation and coating specifications.
- Start the Blasting Operation
Ensure the air compressor is running at normal operating condition and abrasive flow is active. Pressure must be measured during actual blasting, not idle.
- Insert the Needle Pressure Gauge
Insert the hypodermic needle probe into the blast hose approximately 18 inches (450 mm) behind the nozzle. Ensure the needle penetrates into the airflow stream.
- Maintain Full Blasting Conditions
Allow the operator to continue blasting while you take the measurement. Pressure must be recorded under working load conditions.
- Record the Pressure Reading
Observe and record the gauge reading. Most specifications require a minimum of 90 psi (6.2 bar) at the nozzle.
- Verify Compliance
Compare the recorded pressure with project specification requirements. If pressure is below specification, inspect compressor capacity, hose length, fittings, and nozzle wear.
- Document the Results
Record the pressure value, nozzle size, date, location, and inspector name in the blasting inspection report.
FAQ
Most specifications require at least 90 psi (6.2 bar) at the nozzle during active blasting.
This location provides the most accurate representation of true nozzle pressure without interfering with blasting operation.
No. Compressor gauge pressure does not represent actual nozzle pressure due to pressure losses in hoses and fittings.
Low pressure reduces abrasive impact energy, resulting in insufficient anchor profile and poor coating adhesion.
Pressure should be verified at the start of each shift and whenever equipment or nozzle is changed.
If nozzle pressure drops below 90 PSI (6.2 bar), abrasive impact energy decreases significantly. This can result in an inadequate surface profile, poor surface cleanliness, and reduced coating adhesion. Low pressure also slows production rates and may cause rework, increasing project costs.
A worn nozzle typically shows an enlarged orifice diameter compared to its original size. As the nozzle wears, airflow increases but pressure at the nozzle decreases, reducing blasting efficiency. Regular inspection using a nozzle gauge and periodic pressure checks with a hypodermic needle gauge help detect wear early.
Final Word
Nozzle pressure verification is not optional — it’s a control point.
If pressure is wrong, surface profile will be wrong.
If profile is wrong, coating life will suffer.
For QA/QC inspectors, checking nozzle pressure is one of the simplest ways to prevent future coating failures.